Showing posts with label mozzarella. Show all posts

Thursday, May 29, 2014

Cheddar Cheese and More

Been busy making more cheese lately. Cherri-Knoll Greenhouse in PA. is a great source of great milk for making cheese.


I decided to branch out and try cheddar cheese. Got the recipe from http://www.culturesforhealth.com/how-to-make-cheddar-cheese-recipe . I am in the drying stage at the moment.

I used two gallons of milk for this. It made a nice wheel. The hard part is waiting a month or two before trying it. The other problem is I won't know if it turned out ok till then. Making any more at this point wouldn't be a good idea till I know if it turns out. I am still waiting for the provolone I had made. I am getting itchy to try that soon as well. I did make a great wheel of Colby last week.

Pretty isn't it? This I will try soon. Supposedly you don't have to wait for this to age too much. I have it under wraps in my fridge to age just a few weeks.

I am out of mozzarella so with the remaining milk this week I will make more of that. It is my fav to make. I just love the stretching part don't you? You will find that recipe in one of my other blogs. Let me know if you have any questions or comments. They are always welcomed!

Enjoy!
Stephanie

www.webdees.com

Saturday, April 5, 2014

Homemade Mozzarella Part I Let the Curds Begin!


Homemade Mozzarella Cheese Part 1
Let the Curds Begin!

     I am doing this in two parts because it is much easier on time for most people. Also so you can relish in the success of accomplishment of both steps. In the past I have tried over and over again to make mozzarella with hit and miss success. Since I don’t like anything getting the better of me I kept trying till I hit on the best approach to both crucial steps involved. I had pretty much got the first step down pat, which is the easy part that most can do, but the second step eluded me for a long time. I either got a great cheese spread or I got a rubbery rendition of the real deal. I trolled the internet and watched loads of video and never pounced on the same delivery of stretching the cheese which is crucial to making the stuff. I almost lost everything one time and kicked myself in the butt! You know, there has to be hundreds of sites and video on how to make the stuff. Everyone has personal opinion how to make it. Not to mention it’s success…I even watch this one video that touted from start to finish and the darn guy started with commercial made curds and only demonstrated how to stretch it only! Well in my book it was definitely not start to finish. Just part 2. But, to give where credit is due, that particular video did give me a solution to my issue with part 2. Solved all my issues and I am grateful for sure. More on that in part II. So without further ado here is part 1.

             I have been working with one gallon of milk at a time. It is so much easier to work with. I have to mention that lately I have worked with some Amish fresh milk but there isn’t a reason that regular store bought will not work for you too. I have tried this with and without the pickle crisp and with works the best so I recommend it. Ball makes it and it was available at the local Walmart in the canning section. So get some. You will also need citric acid and Junket rennet. Salt is important for preserving as well as taste. DO NOT use table salt. Iodine will ruin it. Use either kosher, sea or my cheap fav pickling salt. No iodine. Important. So, let’s run down the list:
 

1 gal milk of choice (whole and fresh preferable and encouraged for best results)

1 tsp of Ball pickle crisp dissolved in a ¼ cup of non chlorinated water. Important too!

1 tablespoon of citric acid also dissolved in a ¼ cup of non chlorinated water

1 tablet of Junket rennet dissolved in a ¼ cup of non chlorinated water
 
Here we go…I use the double boiler method easier to control the heat.
Bring milk up to room temp. Add the pickle crisp mix wait couple of minutes and add the citric acid mix and stir. Gets lumpy some at this time.
Start to bring up to 89 degrees in the double boiler set up. Usually about 95 degrees in the water should get you where you should be in the milk. Adjust to get to 89-90 with the milk. Stir to distribute heat evenly. Turn off heat when you have to so not to go over.

Once at 89-90 stir in the rennet mix about 20 seconds and for goodness sakes turn off the heat and on again to maintain your temp. Take it off the heat if you have to. Just be gentle. Place the lid on the pot with the temp off and check to make sure every once in a while you still have 89-90 degrees till clean break happens.
To check for clean break take a spoon as in above the whey should be a pale yellow and the curd separates cleanly. Once that happens cut the curd in three different directions and let sit 15 min to release more of the whey.

Gently stir, and then start to raise temp to 102 slowly. The curds will mat and you will want to stir to separate them and evenly cook them.

Do this and maintain the 102 for about 20 min. Strain into a bowl in a colander and transfer over hot whey that you have drained. Make sure the bottom of the colander is not sitting in the whey but over it. You may have to pour off some of the whey but reserve it to make the ricotta!

It will mat which is ok. Flip over still over in the colander over the hot whey. It will help draw off the liquid. I put the lid on top. I find this is easier than transferring to a cloth and hanging. One less mess to deal with. 
At this point you store the resulting curd in the fridge till ready for stretching. Meanwhile, take all the whey and raise the heat and gently boil it for about 30-40 min. and then let sit for a while to cool. strain in a tight weave strainer to get all the ricotta.
Use what is left of the whey for bread baking or if you know someone who is into protein shakes and the like they can use it. It is full of protein. Drink it if you wish or water your plants with it even! Till part 2 the stretching! Come back to see an easy way to do it!
 
Enjoy!
 
Steph
 

Wednesday, December 18, 2013

Pasta and Goodness-Veal and Sausage

As I have mentioned before, it's all about saving money and using what you have. I remember weekends at my Nana's and baking with half the ingredients that the recipe called for. We would either substitute or leave out what she didn't have on hand. It was always an adventure and was always good. Even if it didn't look too good! But hey, it was fun. I have so many memories of those times and I have always cooked the same way. So if you don't have all the ingredients to make a traditional dish make one of your own! Here I made what I had on hand and it was very good. More than good it was great! Let's take a step back and think about the money saving thing. Even though Italian cooking, for maybe you, is something that you may think is exact (I am full blood Italian),  rules can be broken. Make it your own is what I say. So here is what I made and let me tell you it is really good. You can change the meats or omit and put in other things, it doesn't matter. The exercise for this is to make what you can with what you have on hand and satisfy your family. Mushrooms, peppers (easy on the peppers, they tend to dominate the taste of what ever you put them in unless of course if you use roasted red peppers)  sausage, meat of any kind. The combinations are endless. So, back to what I made. I had a package of veal, and a package of Primo sausage and half pound mozzarella.

 I used penna pasta which is my fav but you can use what ever you have on hand. That is the purpose...use what you have.
 
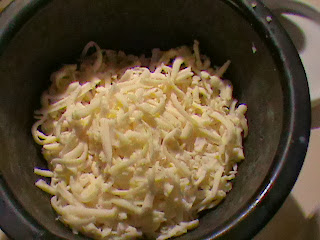
Let me start with a basic sort of marinara sauce. Chop up a couple clove of garlic, some onion, I prefer crushed tomato (see pic), fresh or dried parsley, basil, salt, pepper and optional grated cheese ( I use my home made cheese-only if you ask me to blog that!)

 
Fry up the garlic, onion in some olive oil, add the meat till browned, add tomato and herbs. dash or two of salt and pepper and simmer for about 40 minutes in your cooker.


The veal which I took out to brown the sausage.
We are super cooking here. You can do the long cook way and wait for about two hours if you wish in a regular pot. Cook pasta,

mix with some of your sauce and add to dish with cooked pasta and topped with mozzarella bake in oven 375 degrees for about 20 minutes or until cheese is melted.


Finish up with some of your homemade bread
toasted and wow.
A nice hearty meal to feed the masses!
 
 
Enjoy!
 
Steph

Friday, November 15, 2013

Pizza with Sourdough Crust!

Your sourdough starter should be really happy by now so here is another use for it. I just love not having to run out to the store for yeast because I am out. With a starter going I never run out. With a little planning you can have your crust and eat it too! Pizza is great comfort food as far as I am concerned. I did my term paper for English in college on pizza. My teacher told us to remember your audience when picking our topics. So I did. He was Italian and what Italian doesn't love pizza! Needless to say I aced it! LOL! Didn't hurt bringing in samples either! So you get up in the morning and say to yourself what should I make for dinner that night. Hmmm how about some easy pizza? Great! Let's begin!
Sourdough starter
Flour
Salt
Olive oil
can of diced tomatoes
Mozzarella cheese
Basil
Garlic powder
Topping of choice
 
In the morning take at least two cups of starter in a bowl. Add about a tablespoon of salt, three tablespoons of olive oil and you can add some fresh chopped rosemary and sage if you like to jazz it up. Mix in some flour till it pulls from the sides without sticking. Roll it around in the bowl turning and punching. This way you don't have to mess up your counter with kneading and having flour flying all over the place. Put a clean dish towel over the bowl and place in a draft free area and off to work we go. That night when you get home punch it down and take out of the bowl and give it a little kneading and pat down on your pizza plate or cookie sheet that has been coated with spray or olive oil. You can sprinkle corn meal too for easy release. I was out of cornmeal so I used Pam.  
Let it sit and get happy while we prepare our toppings. We are going to be making a classic Margherita pizza with a Andouille sausage topping to satisfy the meat eater in the house. I like to slice my sausage partial frozen so I get thin even slices. I used Johnsonville Andouille Sausage.

Open a 8 oz. can of diced tomatoes, drained and put in a bowl. Add a couple tablespoons of olive oil, salt to taste, basil, garlic powder and stir up. Set aside. Grate your mozzarella into a bowl and set that aside.

By this time your crust is puffing up a little. Pre-heat your oven to 400 degrees. Put your rack as low as you can in your oven. I usually use a pizza stone or 9-6x6 unglazed quarry tiles but for this I am assuming you don't have something like that and I want anyone to make this. If you are using a stone put that on your rack while the oven is coming up to temp. You want it to be the same temp as the oven. Back to the crust. Spread your tomatoes over the crust.
Add the cheese, about 1/2 pound...I love cheese!
Now your topping...
Looking good! Ding! Your oven is hot! Pop that puppy into the oven. Set timer for 30 min. You will have to keep an eye on it after 20 minutes depending if you are using a stone or not. The crust should be turning a golden brown and the cheese should start to be bubbly. Keep checking till it is nice and even. We don't want the cheese to turn brown.
Now here is the trick for a crunchy crust. Take it out and loosen from the pan with a little shake and shake right onto the rack. The pie should have enough body so it will sit ok on the rack. Let it bake for another 10 minutes and remove back to your pan.
Oh doesn't that look yummy!

There you have it! Let cool a bit before you slice it up. This type of pizza is great as there isn't any sauce to prepare so it is quick and easy. Your family will think you ordered out! Don't forget to feed your starter! Keep it happy and it will keep you happy! Let me know if you have any questions or comments below. I will be happy to answer you.

Ejoy!

Steph
www.webdees.com
www.etsy.com/shop/deesshoppe